I’ve been blogging about our Journey into Value-Added Farm Products for quite a while, but last fall our blog service shut down rather suddenly. I actually lost quite a few posts, and it sent us scrambling to reconstruct all the writing that we’d lost. Anyway, this is our "ReBlog." You’ll notice that everything was posted in one day, even though it was written over a long period of time. I’ve actually rearranged the sequence of the original posts so that it reads better. Hope you enjoy, and feel free to contact me with any questions.
Sunday, April 17, 2011
Introduction
 Hi I'm Billie Jean Salle, of Salle Orchards. My husband Nicholas and I own and operate a beautiful small farm in Wheatland , CA which is approximately 35 miles northeast of Sacramento.
We are absolutely in love with the dirt we live on and are very proud of what we do for a living – farming. However it is a constant uphill battle to survive. We are always challenged with the elements and especially lately the economy. It seems we have all kinds of ideas and dreams of where we would like to take the business but we just can't get ahead enough financially to expand our product line.
 |
| Gardening between the walnut trees |

Being our land is planted with trees, we are committed to the crops we already have, but what we can do with those crops is our future. Our dream to saving our livelihood is in our Value Added Products (VAP) line. With a small grant from the Western SARE Farmer/Rancher Grant program, we are expanding into new territory. We are going to be sun drying some of our tree fruits and candying our walnuts. I will share our experiences, success and failures with you on this learning journey, and hopefully help you to expand your profitability and decrease your losses as well.
 |
| peach blossoms |
Graphic Design

We work with an absolutely wonderful independent designer named Arlene Graham of Digitalgraham Design.
Arlene grew up on a corn/soybean/beef cattle farm in rural Iowa that's been in her family since 1886. Now residing in Placer County, California, Arlene and her husband James document rural life through graphic design, photography and video.
 | |
| Arlene's father and grandfather haying with the cousins on their Iowa farm in the 1920s. |
Arlene works with arts, agriculture and tourism clients developing creative marketing and advertising solutions — including ads, brochures, posters, packaging, exhibits and direct mail. Her artistic and graphic style is well-suited for creating visual marketing materials for our family farm that reflect our sense of place and the pride we have in our product.
 |
| Arlene's design work helps small farms and ranches create an attractive and memorable visual impression of their agricultural enterprises. |
Our Marketing Consultant
 |
| Christina loves to help farmers promote locally grown produce. |
Our marketing consultant, Christina Abuelo, is an experienced nonprofit consultant and farmers’ market organizer. As executive director of an inner city agency on the East Coast, she increased the operating budget by tenfold over four years and developed an array of well-regarded programs in education, housing and health promotion.
As the market manager for a group of farmers' markets in Northern California, she quintupled the budget and significantly increased the group’s profile in the media and the community. In addition, she worked with individual vendors to promote their products more effectively and has developed publicity campaigns, tasting events, media outreach, newspaper articles and special events.
For this project, Christina created copy and provided art direction for marketing materials, produced email newsletters, created and updated the farm’s website, contributed product recipes and conducted research for supply purchases.
Website & Email Newsletter
Probably my biggest handicap is lack of computer skills...if it wasn't for this blog, I probably would still be learning how to "boot" up the system.
However I do know the importance of a website. Maximum exposure is a must in this competitive business world today. I'll tell you, we would be lost without Christina, with her experience in marketing and computer knowledge we now have a very beautiful site in working progress.
However I do know the importance of a website. Maximum exposure is a must in this competitive business world today. I'll tell you, we would be lost without Christina, with her experience in marketing and computer knowledge we now have a very beautiful site in working progress.
Sometimes a new set of eyes can see the beauty in the everyday things that we take for granted. Like buckets of fruit waiting to be packed. She made it look so inviting on the website. We realize we have overlooked a lot of potential marketing tools that were here all along.
For instance a simple newsletter and email signup sheet. Once we put a sign-up sheet out at our farmers' market booth, people were all over it and now we have hundreds of customers waiting for their monthly Farm News. They like to feel connected with a little slice of farm life. Christina has designed a newsletter informing customers of the markets we are attending, what is in season and how the crops are progressing. She inserts recipes, a few health facts and - everyone's favorite - a coupon. The coupons could be tailored for a specific crop that needs to be moved. For example, we did a "heatwave special" on tomatoes and peaches
The Salle Orchards Website
Electronic Newsletter

Farm Logo & Collateral Materials
 |
| Our original logo was a simple outline of a walnut tree. |
When we purchased our walnut farm in 1990, my father, a gifted amateur artist, designed a very simple yet attractive logo for us as a surprise gift. What a perfect way to kick off our new life. We loved our tree from the start, and we initially used it on our business cards.
Our marketing consultant Christina was enthusiastic about the logo and encouraged us to incorporate it into all aspects of the business. A good logo, she told us, is the image that represents a company without necessarily displaying the name or product. (Think of the Nike logo.) It inspires a sense of confidence in customers that the business is worthy of their patronage. A quality logo is iconic and is used on every conceivable medium that a customer could see - from letterhead to website to promotional materials.
Our original logo was turned over to our graphic designer Arlene, and the results stunned us. She added colors, filled in the tree, and added a banner with our name and the phrase “family-owned since 1990.” She presented us with different design options, and we agreed on one version to be used on all our banners, business cards and flyers.
Our original logo was turned over to our graphic designer Arlene, and the results stunned us. She added colors, filled in the tree, and added a banner with our name and the phrase “family-owned since 1990.” She presented us with different design options, and we agreed on one version to be used on all our banners, business cards and flyers.
| Arlene updated the original design with color, the banner on the bottom and the words. |
| Great logos should look good in black and white too. |
We proudly wear our farm’s logowear – tee-shirts, sweatshirts, caps and aprons – to all our markets and special events. Our farmers’ market employees all wear logowear, and this contributes to our booth’s “look” and perception of professionalism. We made shirts which combined our logo with assorted taglines such as “Got Fruit?” “Eat Fresh” “Farmers’ Daughter” and “Next Generation Farmer.” We even have sold some shirts to our customers, who now serve as walking billboards for our farm.
For our business name, Arlene selected a distinctive font called Nueva, a modern typeface that has interesting calligraphic features. It goes well with the logo.
 |
| Front of my business card |
We have made banners for our market booths with our tree logo as the central visual element:
 |
| Above, the banner design from Arlene Graham. Below, the banner hanging in the back of our stall. It's printed on a matte mesh fabric for less wind resistance, so it's more stable. |
 |
| The banner, hanging in the back of our market stall. |
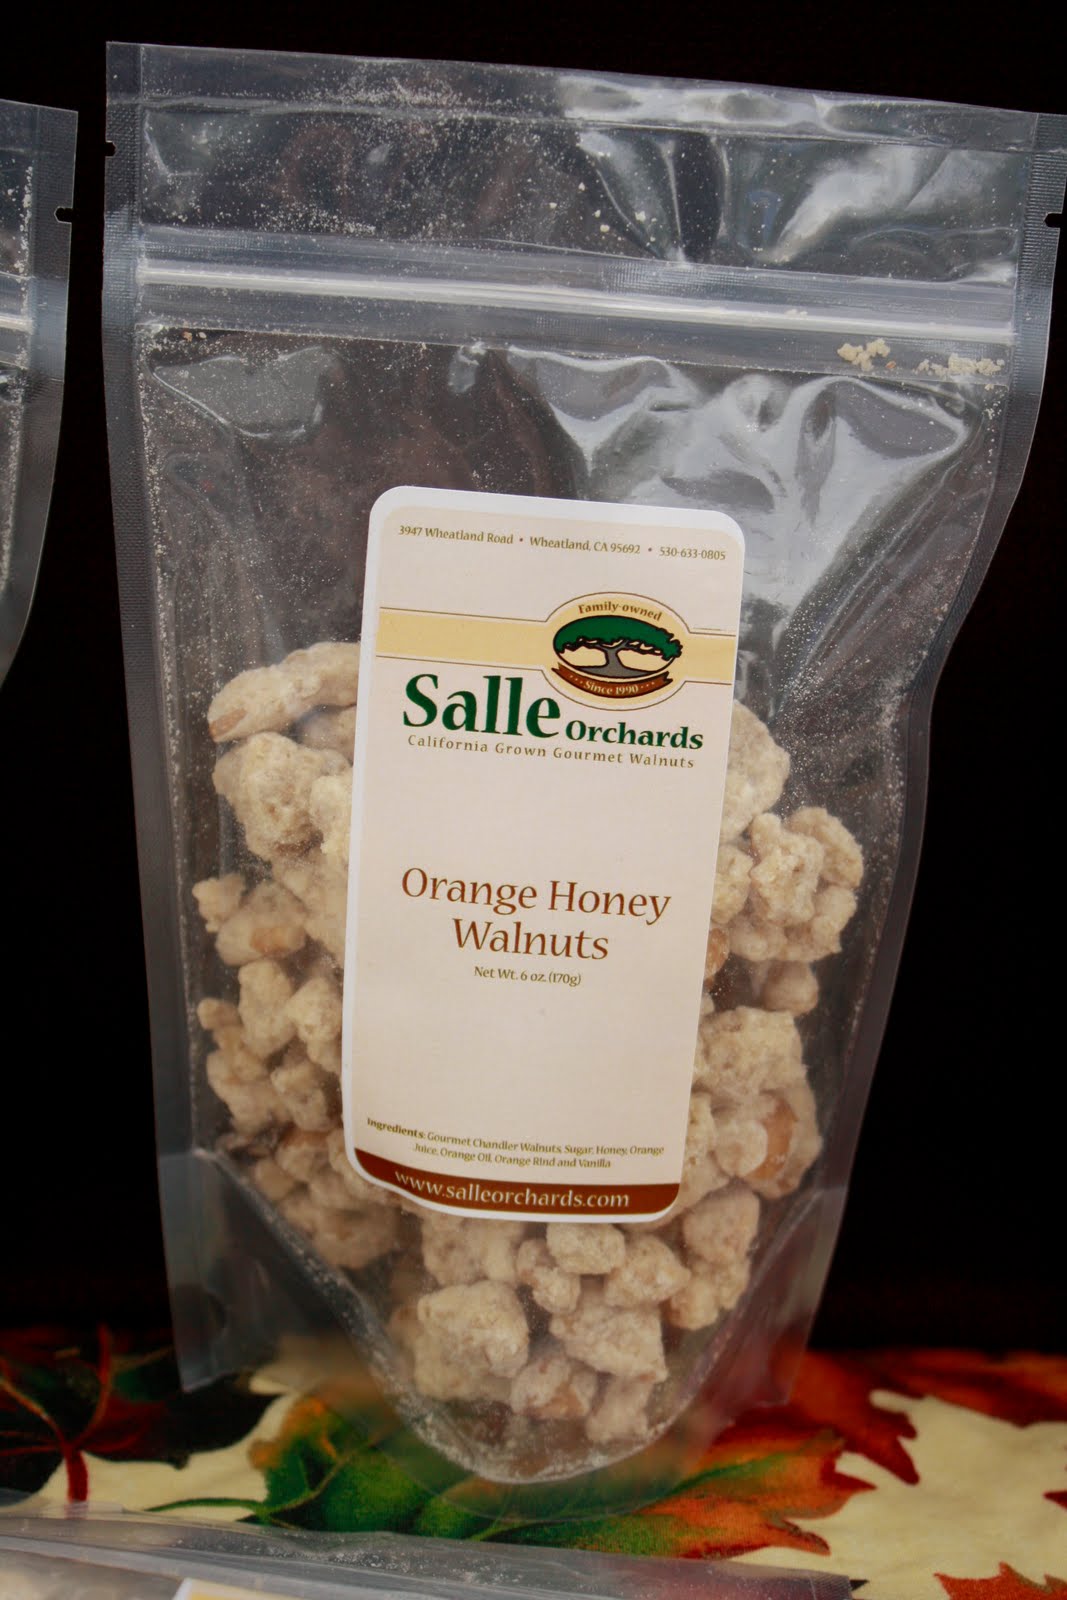
All our packaged product labels are designed around the tree as the focal point.
 | ||||||
| Label for bag of walnuts |
 |
| Farmers' Market schedule |
Arlene and Christina collaborated to make this beautiful 2-sided flyer which we hand out at our farm stand, farmers' markets and festivals.
 |
| Flyer Front |
 |
| Flyer Back |
Since our logo is now ubiquitous, the tree has become a recognizable symbol to our customer base. Based on customer feedback, I believe that that symbol has translated into customer trust and, ultimately, increased sales.
A Visit to Cousin Tom

At the beginning of the project, we visited our cousin Tommy Tomich for a lesson in drying fruit. Born on his family farm about 85 years ago, Tom served in World War II and has farmed ever since.
He has a farm much like ours, with seasonal fruits that he sells direct to the public. But he does not have refrigeration to store extra fruit, so he dries his surplus fruit for fall and winter sales. We spent a couple of hours talking about old times and watching while his workers were cutting and readying the fruit for drying. I was surprised how simple it is and went away wondering why we haven't been drying all along.
Right around that time, we saw an ad in the back of an ag magazine for used drying trays. We drove to the Central Valley to pick them up from a retiring farmer. They were very old and needed repair; some we couldn’t salvage. But the price was right!
The Sulfuring "House"


sulfur. To ensure the enclosure was sealed we will put another tarp (or plastic) over the entire enclosure.


The top of the tarp has a vent cut into it, (just a triangle shaped flap) to get the smoke to travel up through the trays and escape, curing the fruit in the process.The top of the tarp has a vent cut into it, (just a triangle shaped flap) to get the smoke to travel up through the trays and escape, curing the fruit in the process.
Sulfuring Day


When we pick our tree fruit, we immediately grade it and pack it into Panti-Paks in the orchard. The top quality fruit will go to the farmers' market or fruit stand, and the seconds or over-ripes are prepared for drying. We put on plastic gloves for sanitary reasons and because it's a very sticky job.
We cut the fruit in half, remove the pit and place the fruit cut-side up onto an 8 x 3 foot drying tray. We lay the fruit side by side, making sure to squeeze as many pieces as possible on each drying tray. The idea is to have as little space between each piece of fruit to force the smoking sulfur into the fruit and thus preserve it. We found it took about 3 to 3 1/2 boxes of fruit to fill each tray. And most of the day for five or six of us to cut 16 trays worth, so it helps to have a good buddy to visit with while you cut, as it sure makes the time go faster.
The fruit-laden trays are stacked on top of each other, in our very fancy smoking tent, with a little block of wood between each tray to allow the sulfur smoke to circulate. The bottom tray was elevated a little higher off the ground and a narrow trench was dug underneath to encourage the smoke to travel throughout the enclosure. At the inside edge of the enclosure, a coffee can filled with approximately 2 pounds of smoking sulfur (purchased at an orchard supply store) was partially buried (about halfway), for stability. We sealed the sides of the enclosure with shovelfuls of dirt and prepared to light the sulfur. A long fireplace lighter did the trick. My husband Nick stuck it into the can and ignited the sulfur, blowing out the flame if there was one and making sure it was going to smolder and smoke. Then he sealed the remaining flap with dirt, making sure not to get the plastic too close to the smoldering can.
 We stood around until we could see smoke venting from our little cut in the top of the tent just to make sure all was working well. And then you wait, usually overnight, for the process to complete.
 The next morning, we were excited to open the sulfuring tent to check on the fruit. First, we needed to open the sides of the enclosure to air out the sulfur. We left this for about an hour. Since we were drying so many trays at once, we weren't sure if we should have used more sulfur. But the fruit looked beautiful. The little seed cavities were full of juice and the fruit was bleached out beautifully. Perfect! We sat the trays on our cement blocks, in full sun, and took lots of pictures of course!
Sun Drying the Fruit

After we sulfured the fruit, we laid it out in the sun to finish the dehydrating process.
Four days later, the big juicy halves of fruit are shrinking and starting to look like "dried" fruit. There is space in the once crowded fruit trays. The halves are still very moist and gooey and will not store at this point and it will take several more days to finish.
 The black plastic we laid down on the ground has really helped the drying process. We are tasting and testing the fruit and feel some of the smaller fruit is ready to be removed from the trays and put into storage. Our testing process was to break the piece in half and see how moist the interior was. We really liked our fruit to be moist but were concerned that it wouldn't store well unless it was drier. So we decided a little moist, but not gooey, was perfect.
How to Know When It's Done
I spoke to a master food preserver over the weekend and she told me a good way to test the finished fruit for storage was to put a few pieces in the freezer overnight. If the fruit had ice crystals in the middle when broken in half, then it probably will need more time to dry.
Since we will be storing our dried product in refrigeration, we could store a moister fruit safely. Our customers really responded positively to dried fruit that had a little bit of moisture still in it.
I also learned that once the fruit gets close to being dry, checking on it once a day is not enough. You must check on it morning, noon and afternoon. One day, some of our fruit which was moist in the morning got a little too dry by late afternoon and it may be extra chewy. Maybe we could mix it with the moister fruit and it will soften.
First Batch Completed

Our first batch of the fruit is done and we have double bagged it and boxed it up 2 bags per box and stored it in the walk-in. We figure the boxes weigh about 20 pounds each. Our dried-to-fresh ratio was about 5 pounds fresh to make 1 pound dried. Wow, I didn't think we would lose that much in the process.
But let me tell you, the nectarines are fantastic. The peaches remind me of apricots because they are a little tangy. Everything is so good we are going to have to tape the boxes shut just to keep us out. We are so tickled with the dried fruit that I can hardly wait to sell it.
 |
| Dried Pears |
Pears Great, Figs a Bust

It's been a few days since we put the second batch out to dry, and some of them are ready to pick up and store. I tried the figs and well...I've had better. Nick thinks they would taste better if they were not sulfured. We still have a lot of figs so we will try a few next time unsulfured.
The pears are taking twice as long to dry as the peaches and nectarines. I think its because the center of the stone fruit has a hole where the pit was and is thinner and thus dries faster. The pears are much meatier. They're beautiful, with a very, very white meat, the red skin turned a pale pink.
As for the figs - well they puffed up like pure white golf balls and don't taste too good. Like I said we'll see how they turn out unsulfured.
Dried Fruit Sales Flop When Fresh Fruit is Available

 Well I couldn't wait. I have been telling our customers at the Farmers' Market that we were drying some of the fruit and I had requests for some.
 Mind you, we still have fresh peaches that we are selling, but I still took a whole box -- that's about 20 pounds -- thinking it was so good it would fly off the shelf. Wrong! Maybe 3 or 4 people even asked about the fruit. Oh, they wanted samples, but they bought the fresh peaches instead. They loved the dried fruit but said they would wait until the fresh fruit was out of season. So, the lesson here is that timing is important. Selling dried fruit while you have fresh fruit isn't worth the effort. Well, at least I'm enjoying the dried fruit.
West Pac Convention
From the start we knew one of our major expenses’ would be the cost of labels. We knew a printer would be the most cost efficient way to go, but we knew nothing about printers. Our research left us with even more questions than answers. When we were referred to the West-Pac Show in Anaheim, CA, (which is only 6 hours away and definitely doable) we jumped at the opportunity . The show was a huge hands on, questions answered source for all our packaging and printing needs. We left with bags of samples , many business cards and a wealth of knowledge .
Bags
We are having issues with our bags. First, we used the Zip Loc bags; they worked great, but for display purposes they were tacky and ugly. But they were re-sealable, a great convenience for customers. Then we tried a gusseted poly bag. These bags stand up and for presentation purposes are much nicer and showier. With this bag we needed to purchase a heat sealer, adding another step to the bagging process. But then we discovered the cellophane bag. We thought this was the perfect bag. It seemed the customers responded to the shinier bag and sales were up. But we still wanted something that was re-sealable. We tried a gusseted re-sealable bag and liked the way it looks but the price is around 32 cents as opposed to 9 cents with the cellophane bags.
We continue to use the re-sealable bags for the candied nuts and dried fruit to preserve their freshness. For raw nuts, we have gone back to the cellophane bag. However, we are frustrated with the cellophane bags because they are so fragile. With the constant handling, doing set up and dismantling at the farmers’ markets, they tend to tear to easily. So we are still on the journey for the perfect, yet reasonably priced, bag for our raw nut product.
We continue to use the re-sealable bags for the candied nuts and dried fruit to preserve their freshness. For raw nuts, we have gone back to the cellophane bag. However, we are frustrated with the cellophane bags because they are so fragile. With the constant handling, doing set up and dismantling at the farmers’ markets, they tend to tear to easily. So we are still on the journey for the perfect, yet reasonably priced, bag for our raw nut product.
The Airport Sales Gig
This just goes to show, you never know who you might be talking to, your potential future has a bearing on every single person you come in contact with. A good example: we were selling our candy walnuts at the Farmers Market and a repeat customer asked for more information and would we be interested in selling in large quantities? As it turned out she had several kiosks at the Sacramento International Airport. We were very excited this could be our big break!
In order to meet all the requirements for the Airport order we had to make numerous changes and upgrades.
Our contact person wanted a package that would sell for under $4 dollars and they expected to have a profit margin of 35%. We also had to redesign our labels to include nutrition facts, and UPC codes. Then there was the packaging... In order to sell our product for under $4, we needed to reduce the package size. Then we need to reduce it again to accommodate the mark-up margin and not lose money on our side. Our finally package size was a 4-ounce size that would lay flat or could be hung for display. Their cost would be around $1.40, which worked out to a 3 cent profit per bag for us. It's not much but we were trying to get our foot in the door. And hoped to sell larger amounts in the future.
The labeling was another challenge. We opted to include all the required information on a single label to save cost as opposed to 2 labels per package. One in front and one on back. And we needed to get UPC codes added. Nutrition facts and all other pertinent contact information and place of origin. We decided we really wanted to keep our Tree Logo on the label too. Well that meant our labels were going to be rather large and our nut packages were rather small! We considered a wrap around label, but the nut packages were too flat to wrap around successfully. However if we turned the packages sideways that would give as plenty of room to attach the self-sticking label, and all the information would fit. Problem solved.
UPC-A Barcodes
A Universal Product Code (UPC) is a 12-digit unique identifier code for your product represented by scannable bars. Bars of varying widths represent the series of numbers usually shown below the bars. Retailers use barcode scanners to read the bars and convert them back to the 12-digit UPC number that they represent. The cash register then looks up that number in the retailer's inventory system to find the corresponding product name and price. Producers selling in retail environments will need a separate UPC barcode for each particular product and product size. If you have an 8 oz. size and a 16 oz. size, for example, you need to assign two unique numbers.

UPCs originate with a company called the GS1 US (formerly the Uniform Code Council). A manufacturer pays a membership fee plus annual licensing fees for the privilege of having a six-digit manufacturer identification number. The manufacturer identification number is the first six digits of the UPC number -- 639382 in the image above. The next five digits in the UPC -- 00039 -- are the item number. The final number is a check digit, which is calculated based on the other numbers of the bar code.
Last time we checked, you could get a company prefix from GS1, and licensing for 100 product UPCs for $750. Their number is (937) 435-3870.
Small-scale producers can purchase single UPC numbers from four companies in the United States that are legally authorized to resell single UPC numbers: Simply Barcodes (www.UPCcode.us), www.buyabarcode.com, legalbarcodes.com and EZUPC.info. The product numbers from these companies are legitimate, but they will only be valid for as long as the companies are in business. Pricing for buying barcodes in smaller lots from these third-party resellers runs around 1 barcode for $89, 3 for $150, and 6 for $225.
In the end, we found a co-packer, a company that manufactures private label products, to rent us some of their UPC codes for $15 each. The cost is great, but the barcodes are only good for as long as that company keeps paying their annual fees to GS1.
Printing Barcodes on Labels – Barcodes can be printed using most computer printers. You can either install a barcode font – many available free online – on your computer just like any other font, or you can use barcode generating software and import each UPC into your label it as a graphic. For the latter, we used http://www.barcoding.com/upc/.
Label Printer
Salle Orchards is printing about 6,000 multicolor labels a year for our bags of dried fruit, raw nuts and candied nuts. We’ve been buying them in batches of about 1000 – divided into around 200 each of pears, nectarines, apples, peaches and nuts. The cost of getting them through our local print shop is about 14 cents per label. If you factor in the gas money that goes into making runs to the print shop, the price is much higher. We would love to have our own full-color printer in-house but that’s just not affordable to us right now. Color label printers tend to be slow and expensive, not to mention that replacing the color cartridges can get very expensive.
But we settled on a solution that we think will work great – a black ink label printer that prints on rolls of full-color generic labels with our farm name and logo. They full color labels are printed by an outside supplier using 4-color process in either gloss or semi-gloss, and they cost roughly 5 cents each based on a printing run of 10,000. You’ll be assessed a one-time “plate charge” that boosts the cost of your first run of labels. If you have an unusually shaped label, you would also have to pay for a one-time die cut to be made, which I’m guessing is around $500.
These pre-printed color labels come on a roll and they can be fed into a black ink label printer so we can add the “variable information” for each specific product. That may include product name, weight and ingredients. It could also include bar codes and nutrition labels, if you’re selling retail. Also, many label machines can be hooked up to a scale at the Point of Sale, and the variable information can include weight, price per pound and product cost like the kind of label that comes on your purchase of at your supermarket's deli department .
Making the purchasing decision for the label printer is actually very difficult. Naturally, you’ll want your labels to have a professional, high quality look. It’s important to invest in the right printer for your exact application. The top brands include Datamax, Zebra, Sato and Intermec. You have to be careful with salesmen, because they may not be very knowledgeable about some of the products they’re representing, and they may not be able to clearly explain the features and differences for all the brands and models.
Here are some of our considerations:
- · Direct thermal printer versus thermal transfer printer. (They sound similar, but there’s a very important difference. Labels printed with direct thermal have a chemical coating that is susceptible to light and heat. The paper stock is a little more expensive and has to be special ordered. As it ages, the label starts to brown, so you will not be able to keep it around for more than a year. Since Salle Orchards sells at outdoor farmers’ markets, we needed to go with the thermal transfer process, which uses a ribbon and heat to make the ink stick to the label. It lasts longer in direct sunlight and withstands heat better. Some, but not all, printers can do both types of printing, so be sure you know how the ink gets on the label.
- · Label Printer software: Geesh, this is confusing too. Popular brands include Labelview Basic ($249), Label View ($400), Label Matrix and Bartender, among others.
- · Dots per inch, or dpi. The higher the quality the printer, the more dpi you’ll get out of it. And the more expensive it will be.
- · Buying a new versus a much discounted refurbished printer. The refurbished ones may be returns, floor samples, reconditioned trade-ins, etc. Generally, the price is lower, but the guarantee is for a much shorter period of time than a new unit.
- · The print head. It’s the most important part of the label printer, and it needs regular maintenance. Basically, it needs to be wiped clean occasionally, so make sure it’s easy to reach.
- · Printer ports to connect to your computer. For example, the Datamax I-4208, one of the leading printers, comes with a parallel, serial and ethernet port.
- · Oh, and cost.
Local Sales
We were so excited about our line of candied nuts and would share them with our neighbors and friends. Because of their encouragement and word of mouth, we were approached by the local business in town. Well, we live in a very small town (5 blocks long), but we do have a pharmacy, grocery store, hardware store and gas stations. Several of these business were kind enough to stock our walnut products.
Our town is in the heart of walnut country and I figured that more nuts would be the last thing the locals would want. I was very proud of our product and so happy to see that the stores' inventory was selling down. It didn't hurt that the holidays were approaching either. The feedback was positive and we were thrilled.
As it turned out that was probably the wrong thing to do. Later that winter we received a letter from the Walnut Bargaining Board informing us we were out of compliance and that we needed to become a "handler" and pay fees based on sales. After checking into the requirements, we were not able to satisfy the on site certified kitchen yet. So our wholesale and internet sales are shelved for a while....
Candied Walnuts

A couple of years ago, our walnut crop was very poor, probably close to half of a normal production. It was a very scary time for us because we knew it was going to be a tight year financially as a result. We needed to find other avenues to market our nuts that would bring in enough money to get the next year's crop in. We were already selling at the farmers market, and roadside stands as well as wholesale.
 Selling wasn't the problem, we just didn't have enough nuts to sell. So how could we take the few nuts we had and turn them into a higher dollar income? We decided to try candying them because for each pound you candy you get back almost a pound and a half of finished product. We have been giving away recipes for candied nuts at the markets for years, but were unable to actually make them for resale because we didn't have a commercial kitchen.
  In order to candy the nuts they had to be cracked first. We didn't think that would be much of a problem, but were surprised to find out no one was willing to do the small amounts we needed. The company we had crack for us in the past wanted a 10,000 pound minimum. Gulp, there was no way we could come up with that kind of amount. We ask other growers if they wanted to go in with us but they didn't want to be bothered with the storage and the marketing afterwards. And we found a lot of the old timers that we were referred to had retired.
 Finally we were put in touch with a fellow farmer about an hour and a half away who agreed to crack for us. Due to the small run size, It costs us about $1 a pound for cracking.
So the next hurdle was the candymakers. We began to research business that candied almonds and pistachios to see if they would do walnuts as well. The problem with candy walnuts is the shelf life is so short after they are processed that most companies don't want to mess with them.
So the next hurdle was the candymakers. We began to research business that candied almonds and pistachios to see if they would do walnuts as well. The problem with candy walnuts is the shelf life is so short after they are processed that most companies don't want to mess with them.
 We found a company fairly local (within 40 miles), but they would only use their recipes. However, they would let us do a minimum of only 25 pounds per flavor. And they had several flavors to choose from. This would give us a chance to sell some of the candy nuts to make enough money to candy a larger batch the next time. And we could have a larger variety to sell at a time. We also liked the idea they used honey, real butter and real vanilla in their recipes upon request. So we loaded up with samples of candied almonds and went home to taste and decide, which wasn't that easy because they were all good and we weren't sure if the walnuts would taste as good as the almonds. We were told they would make anything we wanted, BUT, if it didn't turn out to our liking, the nuts were ours and we were still paying for it! So now was the big step . What if they didn't sell fast enough? How many flavors should we do at a time? Getting proper labels designed that would meet all the codes. This would mean more paper work and time to get all the permits and documents required before we could sell at the farmers markets.
 Then we found out not all the farmers markets would allow VAP products to be sold unless you grew all the ingredients or because they weren't considered nutritious enough, even though they were made with honey. There were bags to consider. OK do we use bags that lay flat so you could look down on them? Or do we bag them in bags that are gusseted and will stand up for displaying on shelves? Poly bags or cellophane bags, zip lock bags so you could reseal or the cheaper ones that you stable or melt to seal? And then, there is the size of bags to consider, What do you think the public wants. A large bag that isn't eaten at one sitting will loose its crunchiness if not resealed properly. But a small bag looked too skimpy. We also found a shiny bag made a difference over a dull bag The digital we were using at farmers' markets would not weigh in ounces, so it was hard to do any odd size but 1/4 pound or 1/2 pounds. We knew the smaller the bag the more profit margin, but there was a point that it looked to skimpy and the customer felt cheated. We found out the size of the nut made a difference too. We were all proud of the beautiful halves we had but they weren't necessarily the best choice for candy, because if you coated smaller pieces your return weight was greater. The halves would break up in the cooking process anyway. However we still chose to use large pieces and halves because it looked prettier in the finished bag. We wanted the customer to get the biggest and the finest product we could provide.
Bags
We are having issues with our bags. First, we used the zip loc bags; they worked great, but for display purposes they were tacky and ugly. But they were re-sealable, a great convenience for customers. Then we tried a gusseted poly bag. These bags stand up and for presentation purposes are much nicer and showier. With this bag we needed to purchase a heat sealer, adding another step to the bagging process. But then we discovered the cellophane bag. We thought this was the perfect bag. It seemed the customers responded to the shinier bag and sales were up. But we still wanted something that was re-sealable. We tried a gusseted re-sealable bag and liked the way it looks but the price is around 32 cents as opposed to 9 cents with the cellophane bags. So once again we have gone back to the cellophane bags for the raw nuts, but continue to use the re-sealable bags for the candied nuts to preserve their freshness. However, we are frustrated with the cellophane bags because they are so fragile. With the constant packing up and handling at the farmers’ markets, they tend to tear to easily. So we are still on the journey for the perfect, yet reasonably priced bag for our raw nut product.
Subscribe to:
Comments (Atom)